ShopDreamUp AI ArtDreamUp
Deviation Actions


Suggested Deviants


![Doll Angelique [WIP]](https://images-wixmp-ed30a86b8c4ca887773594c2.wixmp.com/f/e5e18a9a-fee7-45fd-a797-61fb73b9693c/d9xooyd-239ab2ce-a513-4772-9803-96452babe836.jpg/v1/crop/w_92,h_92,x_19,y_0,scl_0.10267857142857,q_70,strp/doll_angelique__wip__by_angelangelyss_d9xooyd-92s.jpg?token=eyJ0eXAiOiJKV1QiLCJhbGciOiJIUzI1NiJ9.eyJzdWIiOiJ1cm46YXBwOjdlMGQxODg5ODIyNjQzNzNhNWYwZDQxNWVhMGQyNmUwIiwiaXNzIjoidXJuOmFwcDo3ZTBkMTg4OTgyMjY0MzczYTVmMGQ0MTVlYTBkMjZlMCIsIm9iaiI6W1t7ImhlaWdodCI6Ijw9NTU4IiwicGF0aCI6IlwvZlwvZTVlMThhOWEtZmVlNy00NWZkLWE3OTctNjFmYjczYjk2OTNjXC9kOXhvb3lkLTIzOWFiMmNlLWE1MTMtNDc3Mi05ODAzLTk2NDUyYmFiZTgzNi5qcGciLCJ3aWR0aCI6Ijw9MTAyNCJ9XV0sImF1ZCI6WyJ1cm46c2VydmljZTppbWFnZS5vcGVyYXRpb25zIl19.2mHg84ohgqXb3V-TwKYOqSBgxU9-eEVGU7-RcR9ZPNA)
![[Cosplay WIP] Fru Fru's dress](https://images-wixmp-ed30a86b8c4ca887773594c2.wixmp.com/f/e5e18a9a-fee7-45fd-a797-61fb73b9693c/dc8tq8k-29dc5e02-5d43-4ac2-8c86-c3d24e228e2c.jpg/v1/crop/w_92,h_92,x_0,y_1,scl_0.037186742118027,q_70,strp/_cosplay_wip__fru_fru_s_dress_by_angelangelyss_dc8tq8k-92s.jpg?token=eyJ0eXAiOiJKV1QiLCJhbGciOiJIUzI1NiJ9.eyJzdWIiOiJ1cm46YXBwOjdlMGQxODg5ODIyNjQzNzNhNWYwZDQxNWVhMGQyNmUwIiwiaXNzIjoidXJuOmFwcDo3ZTBkMTg4OTgyMjY0MzczYTVmMGQ0MTVlYTBkMjZlMCIsIm9iaiI6W1t7ImhlaWdodCI6Ijw9MTA3NSIsInBhdGgiOiJcL2ZcL2U1ZTE4YTlhLWZlZTctNDVmZC1hNzk3LTYxZmI3M2I5NjkzY1wvZGM4dHE4ay0yOWRjNWUwMi01ZDQzLTRhYzItOGM4Ni1jM2QyNGUyMjhlMmMuanBnIiwid2lkdGgiOiI8PTEwMjQifV1dLCJhdWQiOlsidXJuOnNlcnZpY2U6aW1hZ2Uub3BlcmF0aW9ucyJdfQ.H36mACj0BLd0NllX0C9vmQzjmGmpeMnhy2Dz70itB5g)
![Guzma [WIP]](https://images-wixmp-ed30a86b8c4ca887773594c2.wixmp.com/f/e5e18a9a-fee7-45fd-a797-61fb73b9693c/dau7669-9cb79cad-4a45-496e-9297-61d3011d07da.jpg/v1/crop/w_92,h_92,x_0,y_13,scl_0.028430160692213,q_70,strp/guzma__wip__by_angelangelyss_dau7669-92s.jpg?token=eyJ0eXAiOiJKV1QiLCJhbGciOiJIUzI1NiJ9.eyJzdWIiOiJ1cm46YXBwOjdlMGQxODg5ODIyNjQzNzNhNWYwZDQxNWVhMGQyNmUwIiwiaXNzIjoidXJuOmFwcDo3ZTBkMTg4OTgyMjY0MzczYTVmMGQ0MTVlYTBkMjZlMCIsIm9iaiI6W1t7ImhlaWdodCI6Ijw9MTU4OSIsInBhdGgiOiJcL2ZcL2U1ZTE4YTlhLWZlZTctNDVmZC1hNzk3LTYxZmI3M2I5NjkzY1wvZGF1NzY2OS05Y2I3OWNhZC00YTQ1LTQ5NmUtOTI5Ny02MWQzMDExZDA3ZGEuanBnIiwid2lkdGgiOiI8PTEwMjQifV1dLCJhdWQiOlsidXJuOnNlcnZpY2U6aW1hZ2Uub3BlcmF0aW9ucyJdfQ.iUnmoKg5DtWC9NGgkHUzyWS-8IE14sFBxi0m4qhRsUk)
Suggested Collections


You Might Like…


![Doll Angelique [WIP]](https://images-wixmp-ed30a86b8c4ca887773594c2.wixmp.com/f/e5e18a9a-fee7-45fd-a797-61fb73b9693c/d9xooyd-239ab2ce-a513-4772-9803-96452babe836.jpg/v1/crop/w_184,h_184,x_39,y_0,scl_0.20535714285714,q_70,strp/doll_angelique__wip__by_angelangelyss_d9xooyd-92s-2x.jpg?token=eyJ0eXAiOiJKV1QiLCJhbGciOiJIUzI1NiJ9.eyJzdWIiOiJ1cm46YXBwOjdlMGQxODg5ODIyNjQzNzNhNWYwZDQxNWVhMGQyNmUwIiwiaXNzIjoidXJuOmFwcDo3ZTBkMTg4OTgyMjY0MzczYTVmMGQ0MTVlYTBkMjZlMCIsIm9iaiI6W1t7ImhlaWdodCI6Ijw9NTU4IiwicGF0aCI6IlwvZlwvZTVlMThhOWEtZmVlNy00NWZkLWE3OTctNjFmYjczYjk2OTNjXC9kOXhvb3lkLTIzOWFiMmNlLWE1MTMtNDc3Mi05ODAzLTk2NDUyYmFiZTgzNi5qcGciLCJ3aWR0aCI6Ijw9MTAyNCJ9XV0sImF1ZCI6WyJ1cm46c2VydmljZTppbWFnZS5vcGVyYXRpb25zIl19.2mHg84ohgqXb3V-TwKYOqSBgxU9-eEVGU7-RcR9ZPNA)

Description
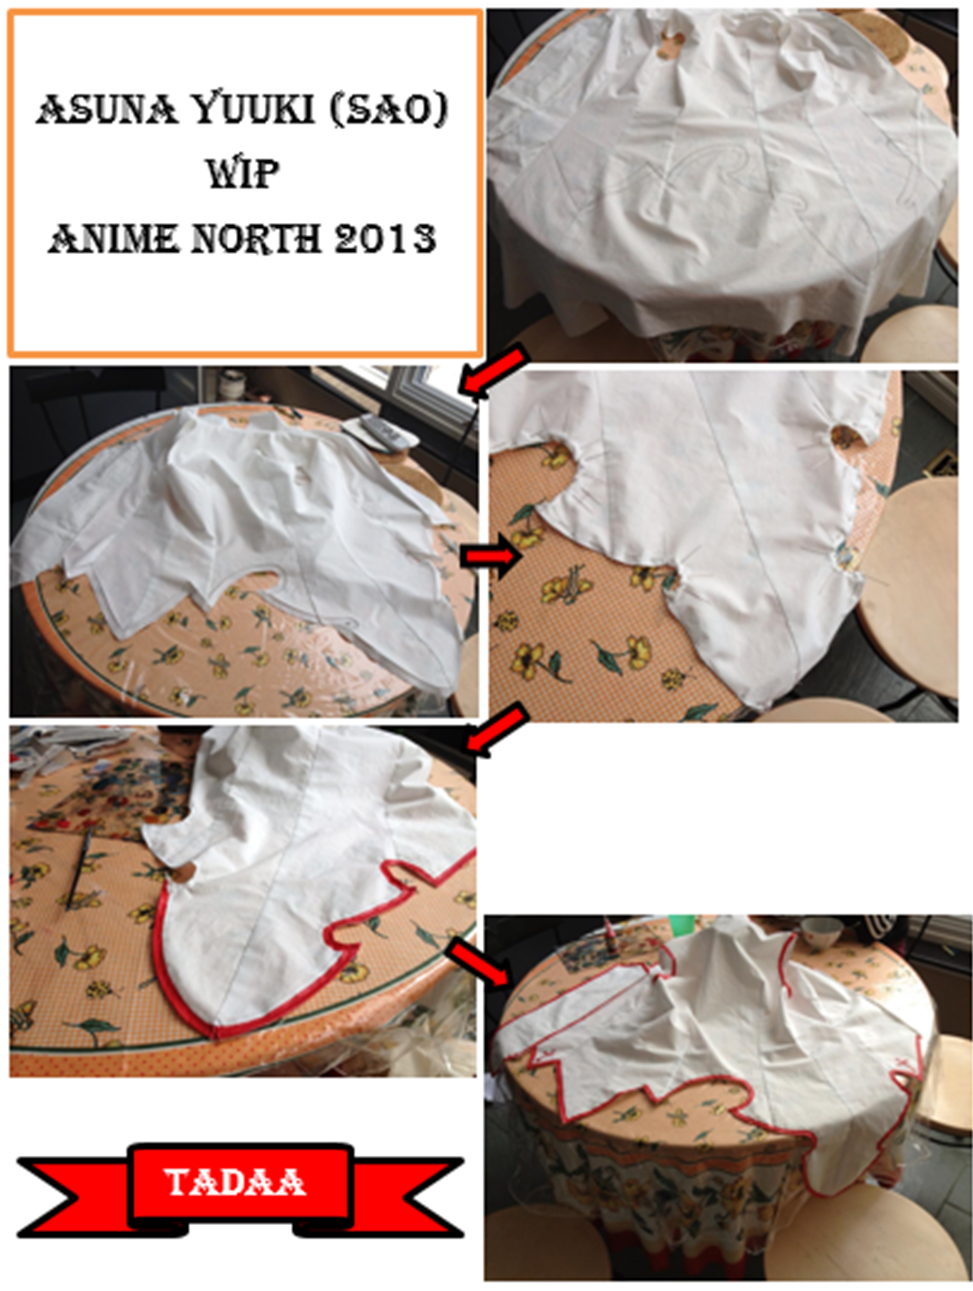
So I was a total trope-er this year (according to my friends). SAO was all the rage before SnK kicked it out as most popular.
Even though the series was alright, I really did like the jacket! Especially the detailing for the hem at the bottom and the little add ons like the crosses and the front and so on.
This is only a portion of the WIP that I photographed...but the rest I pretty much either forgot to take pics of, or simply couldn't make myself give a crap enough to do so. I also had a monopoly on the dining room table and refused to move elsewhere.
I would also like to say I got this idea from someone else's tutorial, and they were pretty much a life saver. I can't remember where I saved it, but when I do, I'll link it.
Material: Heavy weight cotton
Paint: Scribbles 3D Paint, Christmas Red (not the best medium, but it does the job)
So in chronological order:
1) After I had sewn the jacket together and made sure it fit me properly (pinching and increasing the darts), I started to pencil the bottom design in. This is where the designs get a little sketchy... You see, most people show Asuna from the left, therefore showing u the pretty curved part of the design. The right side is more of let's-guess-slash-what-the-crap. Any who, I managed to make it look as close to the design as possible, then made the right side flow as nicely as possible.
2) REMEMBER TO ADD YOUR SEAM ALLOWANCE (for the love of cookies, PLEASE do). Measure it out (I believe mine was 3/4 in, like the rest of the garment. Then snip it out. Serging the edges or zig-zagging them is also an option.
3) This is where I could have done a better job but I just WASN'T thinking... Here you see I've pinned the crap out of the hems. Then I proceeded to sew it painstakingly slow. This is what you SHOULD HAVE done: Trace the bottom hem pattern onto some of the leftover fabric, cut it out, and sew them right-on-right. Then flip inside out, press out all the little creases from the curves, and finally top stitch it into place.
4) Start that back-aching-hours-upon-hours paint job. I used this tiny little brush for the lines and detailed crosses and just spam painted the edges. I had done all the detailing in pencil then followed the lines using a ruler (trust, this makes life EASIER).
5) Final Product: After a couple days and hours of painting til my back hurt, I finished! Too bad I didn't take a real picture with it on, its pretty nice.
**Side note: Yes I know that the bottom skirt part isn't there, and for good reason too! The seam that would attach the cloth to the jacket would just be really visible and ugly, so I attached it onto the skirt. I got real lazy and just safety pinned it, mostly because I wouldn't be able to get out of the skirt if I did...LOL**
<<WIP made on Word because I can't figure out how to use software of any kind>>
Image size
973x1291px 2.23 MB
© 2013 - 2024 HaneNoMizu
Comments0
Join the community to add your comment. Already a deviant? Log In